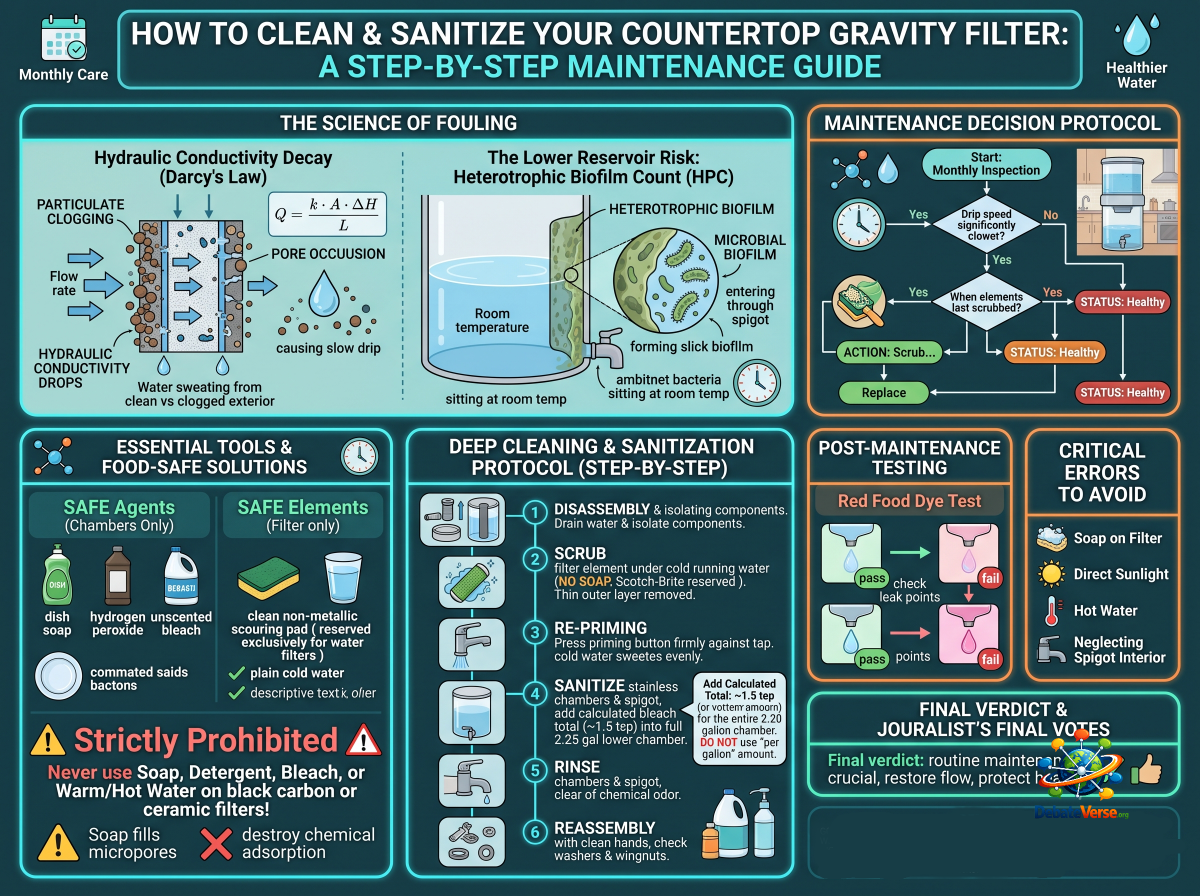
How to Clean & Sanitize Your Countertop Gravity Filter: A Step-by-Step Maintenance Guide
Gravity-fed water filtration systems—such as those made by Berkey, British Berkefeld, Zen Water, and Alexapure—are prized for their mechanical simplicity. Operating entirely without electricity or under-sink plumbing, they rely on gravitational head pressure to force water through dense ceramic or activated carbon filter elements.
However, because these systems process unchlorinated water in open, room-temperature chambers, routine maintenance is not merely cosmetic—it is a critical biological necessity.
Over time, raw water upper chambers accumulate heavy silt, rust, and organic biofilm. Simultaneously, the lower reservoir—which stores purified, chlorine-free water—becomes vulnerable to atmospheric bacterial colonization if neglected. This step-by-step guide covers the fluid dynamics of filter clogging, safe chemical sanitization ratios, and the exact protocol required to restore flow rates and guarantee biological safety.
=>Check out these Brand products on Amazon:
1. The Science of Chamber Fouling: Flow Rates & Bacterial Growth
Understanding why gravity filters require specialized cleaning begins with the physics of fluid transport through micro-porous media.
[ GRAVITY SYSTEM BIO-FOULING PROFILE ]
 ├─ Upper Chamber: Particulate Clogging   --> Silt, rust, and micro-algae coat filter exterior
 ├─ Filter Elements: Pore Occlusion       --> Hydraulic conductivity drops, causing slow drip
 └─ Lower Chamber: Heterotrophic Biofilm   --> Purified, unchlorinated water sitting at room temp
Hydraulic Conductivity Decay (Darcy's Law)
The volumetric flow rate () through a gravity filter element is governed by Darcy’s Law for fluid flow through porous media:
Where:
As suspended solids, silt, and iron rust deposit on the exterior surface of the filter element, effective hydraulic conductivity () drops dramatically. Scrubbing the exterior physically shears off this clogged outer layer, exposing fresh, open micropores and restoring the system's baseline flow rate without needing premature filter replacement.
The Lower Reservoir Risk: Heterotrophic Plate Count (HPC)
Once raw tap or well water passes through an activated carbon element, all residual chlorine disinfectant is removed. While this produces clean-tasting water, it leaves the lower storage chamber devoid of chemical sanitizers.
If purified water sits in the lower chamber at ambient room temperature () for several days, ambient bacteria entering through the spigot air relief hole can form a slick microbial biofilm along the interior stainless steel walls and spigot assembly.
2. Maintenance Decision Protocol
Use this diagnostic protocol to determine whether your system requires routine chamber washing, exterior element scrubbing, deep sanitization, or a full filter replacement:
3. Essential Tools & Food-Safe Sanitizing Solutions
Before beginning maintenance, gather the correct cleaning agents. Using incorrect supplies can permanently ruin porous filter elements.
Safe vs. Unsafe Cleaning Agents
Sanitizing Solution Dilution Math
When sanitizing stainless steel chambers and spigots with unscented household bleach ( stock concentration), aim for a active chlorine solution.
To calculate the precise volume of stock bleach () needed for your chamber volume ():
For a standard () lower reservoir:
4. Step-by-Step Deep Cleaning & Sanitization Protocol
Perform this full sanitization procedure every 3 to 6 months, or whenever system flow rate drops noticeably.
Step 1: Disassembly & Component Isolation
1. Wash your hands thoroughly with soap and water to avoid transferring bacteria to clean parts.
2. Drain all water from the system.
3. Unscrew the wingnuts holding the filter elements inside the upper chamber. Carefully remove the elements and set them on a clean towel. Handle them by the plastic base, taking care not to drop them.
4. Unscrew the spigot assembly from the lower chamber. Dismantle the silicone washers, bevels, and internal valve stem.
Step 2: Scrubbing the Filter Elements
1. Hold a filter element under cool running tap water.
2. Using a fresh, clean Scotch-Brite pad (or stiff nylon brush), scrub the exterior surface firmly.
3. Scrub in circular motions from top to bottom until a thin outer layer of carbon/ceramic is sloughed off, revealing a fresh surface layer.
4. Do not use soap, detergents, or hot water.
Step 3: Re-Priming the Elements
Scrubbing compresses air into the dry micropores. Re-priming forces water through the interior stem to push air out, restoring gravitational water flow:
1. Press the soft rubber priming button (or universal priming syringe) against the threaded stem of the filter.
2. Press the button firmly against your sink faucet.
3. Turn on cold water slowly, allowing water pressure to fill the internal cavity of the element.
4. Hold until water sweats evenly through the entire exterior surface wall of the filter. Repeat for all elements.
Step 4: Sanitizing Stainless Steel Chambers & Spigot
1. Wash both upper and lower stainless steel chambers with warm water and mild dish soap using a non-abrasive sponge. Rinse thoroughly.
2. Soak dismantled spigot parts (silicone washers, plastic spigot body) in a small bowl filled with a bleach solution ( bleach per gallon of water) or Hydrogen Peroxide for 15 minutes.
3. Fill the lower stainless steel chamber with cold water, add of unscented household bleach, stir, and let sit for 15 to 20 minutes.
4. Drain through the spigot hole to sanitize the threads, then rinse all stainless components twice with clean tap water until all chemical odor is gone.
Step 5: Reassembly & Seal Verification
1. Reinstall the spigot assembly into the lower chamber. Ensure silicone washers are placed correctly (one inside, one outside) to prevent leaks.
2. Insert filter stems through the holes in the upper chamber. Thread rubber sealing washers onto the stem inside the upper chamber, and tighten wingnuts underneath by hand only. Do not over-tighten, as this deforms the rubber washers and creates raw-water bypass gaps.
3. Place the upper chamber onto the lower chamber.
5. Post-Maintenance Testing: The Red Food Dye Test
After cleaning elements or replacing washers, conduct a Red Food Dye Test to verify that raw water is not bypassing the filter media through loose seals or hairline element cracks.
[ RED FOOD DYE INTEGRITY TEST ]
 1. Fill upper chamber with water.
 2. Add 1 teaspoon of RED liquid food dye (Must be Red Dye #40; DO NOT use gel or blue/green dye).
 3. Stir water until bright red.
 4. Monitor dispensed water in lower chamber:
    ├─ Pure Clear Water  --> PASS (Membrane & seals 100% intact)
    └─ Pink / Red Water   --> FAIL (Bypass leak at washer or cracked filter stem)
If the dispensed water turns pink or red, check the following failure points:
6. Critical Maintenance Errors to Avoid
Avoid these four common mistakes that permanently ruin filter hardware:
1. Using Dish Soap on Filter Elements: Activated carbon absorbs soap molecules instantly. Once absorbed, soap cannot be washed out, ruining the taste and chemical binding capability forever.
2. Drying Elements in Direct Sunlight: Thermal expansion from solar heat cracks outer ceramic shells and splits black carbon bonding resins. Always air-dry elements indoors at room temperature.
3. Using Hot Water: Running hot water () through gravity elements can melt internal binding glues and structural end-caps.
4. Neglecting the Spigot Interior: Biofilm thickens inside the narrow spigot valve channel. Failing to scrub the interior spigot channel with a small pipe-cleaner brush leaves a continuous source of bacterial re-contamination.
The Journalist’s Final Verdict
A countertop gravity filter is an exceptional, off-grid purification asset, but its health performance depends entirely on routine owner maintenance.
By adhering to this maintenance discipline, you protect your household from biological re-contamination while maximizing the multi-year operational lifespan of your filter investment.
Main References
1. Centers for Disease Control and Prevention (CDC). (2022). A Guide to Drinking Water Treatment Technologies for Household Use. U.S. Department of Health and Human Services.
2. World Health Organization (WHO). (2020). Boil Water Advisories and Household Water Treatment Sanitation Protocols. WHO Guidelines for Drinking-Water Quality.
3. Water Quality Association (WQA). (2021). Disinfection and Sanitization of Point-of-Use Water Filtration Devices. WQA Technical Fact Sheet Series.
4. NSF International. (2023). NSF/ANSI Standard 42: Drinking Water Treatment Units - Aesthetic Effects. Ann Arbor, MI: NSF International.